To change the “Out of Stock” text in WooCommerce easily, you can follow these steps:
Please note that the method described here may not require any coding skills, as it involves using a popular plugin called “Say What?” to replace the text without modifying any code.
- Install and activate the “Say What?” plugin:
- Go to your WordPress dashboard.
- Navigate to “Plugins” > “Add New.”
- Search for “Say What?” and click “Install Now” next to the plugin with that name.
- Once installed, click “Activate” to activate the plugin.
- Access the “Say What?” settings:
- After activating the plugin, go to “Tools” > “Text changes” in your WordPress dashboard.
- Add a new text change rule:
- Click on “Add New” to create a new text change rule.
- Configure the text change rule:
- In the “Original string” field, enter the default “Out of Stock” text that WooCommerce displays when a product is out of stock.
- In the “Text domain” field, enter
woocommerce. - In the “Text context” field, enter
Product status. - In the “Replacement string” field, enter the custom text you want to display when a product is out of stock (e.g., “Sold Out”).
- Save the changes:
- Click on the “Add” button to save the text change rule.
- Clear any caching:
- If you have caching enabled on your website, clear it to see the changes take effect immediately.
Now, when a product is out of stock on your WooCommerce store, it should display the custom text you specified using the “Say What?” plugin.
Changing the currency symbol (د.إ to AED) and tax label (VAT) for the UAE in Woocommerce
Keep in mind that using plugins for text replacements is a quick and user-friendly solution. However, if you prefer to make this change through code modifications, you can do it by creating a child theme and overriding the appropriate template files or using custom functions within your theme’s functions.php file.
To Change Out of Stock Text in WooCommerce Easily Without any plugin
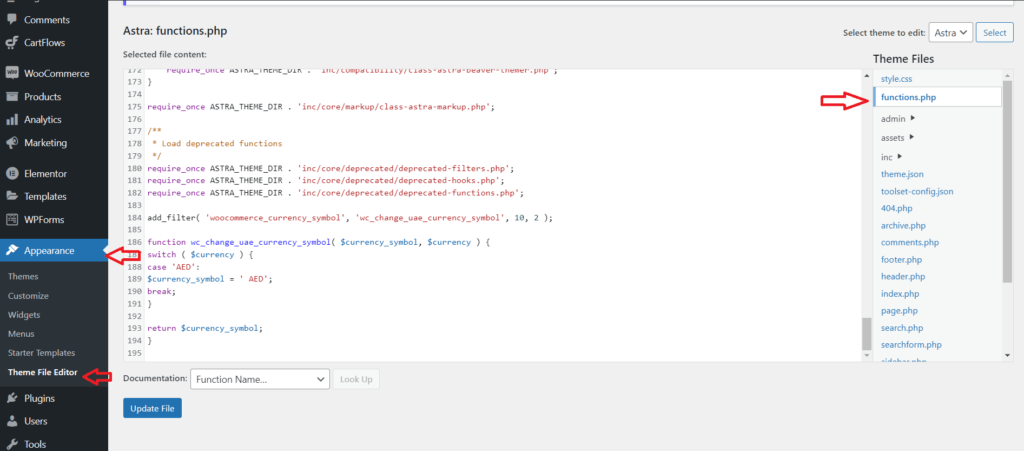
To change the “Out of Stock” text in WooCommerce without using any plugins, you can do it by adding a simple code snippet to your theme’s functions.php file. Here’s how you can achieve this:
- Access your WordPress theme files:
- Go to your WordPress dashboard.
- Navigate to “Appearance” > “Theme Editor.”
- On the right-hand side, find “Theme Files” and click on “Theme Functions (functions.php).”
- Add the code snippet:
- Add the following code at the end of the functions.php file:
function change_woocommerce_out_of_stock_message( $text ) {
    $text = 'Sold Out'; // Replace 'Sold Out' with your desired custom text
    return $text;
}
add_filter( 'woocommerce_out_of_stock_message', 'change_woocommerce_out_of_stock_message' );
- Save the changes:
- Click on the “Update File” button to save the changes to your functions.php file.
- Clear any caching:
- If you have caching enabled on your website, clear it to see the changes take effect immediately.
Now, when a product is out of stock on your WooCommerce store, it should display the custom text you specified without the need for any plugins.
Please note that modifying theme files directly is not recommended, as it can be overwritten during theme updates. To ensure better compatibility and maintainability, it’s advisable to use a child theme or create a custom plugin to hold your customizations. If you’re not familiar with these methods, you can use the “Say What?” plugin as described in the previous answer.
To Change Out of Stock Text on the Shop page on products images Easily

- Access your WordPress theme files:
- Go to your WordPress dashboard.
- Navigate to “Appearance” > “Theme Editor.”
- On the right-hand side, find “Theme Files” and click on “Theme Functions (functions.php).”
- Add the co
- Add the following code at the end of the functions.php file:
add_action( 'woocommerce_before_shop_loop_item_title', function() {
global $product;
if ( !$product->is_in_stock() ) {
echo '<span class="sold-out-overlay">sold out</span>';
}
});- Save the changes:
- Click on the “Update File” button to save the changes to your functions.php file.
- Customize CSS
- Go to your WordPress dashboard.
- Navigate to “Appearance” > “Customize”
- On the left-hand side, find “Theme Files” and add CSS Code:
.ast-shop-product-out-of-stock {
    display: none;
}

.sold-out-overlay {
    bottom: 1em;
    text-transform: uppercase;
    font-weight: 700;
    position: absolute;
    background-color: rgba(255,255,255,.88);
    transition: background .3s;
    text-align: center;
    left: 1em;
    right: 1em;
    padding: 0.5em 0 0.7em;
}
If you have caching enabled on your website, clear it to see the changes take effect immediately.
Now, when a product is out of stock on your WooCommerce store, it should display the custom text you specified without the need for any plugins.


0 thoughts on “How to Easily Change Out of Stock Text in WooCommerce”